Your cart
There are no more items in your cart
There's no such thing as too many accessories for women or gents(if you may). Just something about them that you cannot resist and keep buying them.
The magic lies in accessories that take your overall fit to the next notch. And it is understandable why we fall into this loop of wanting to keep buying it. It’s so irresistible. But…some things just don't feel right. What you may ask?
We keep fighting this irresistible urge of wanting to continuously buy accessories but then it just doesn’t feel right for you. When you wear an accessory, you want it to tie up your look but not define you or change your individuality; that’s impossible with store-bought accessories.
Yes, there is an option of getting your accessories personalized, but that can hit hard on your wallet. Keep in mind it takes a lot of time to get something customized. And if you’re a parent and want this for your kids, something like this is just unreasonable.
So here’s a quick, easy, and fun way to create your own very special accessories. What’s even better? You don’t have to pay a high price or have to wait at least two weeks to get your hands on it. And touching base for our lovely parents, we promise you, it will be a lot of fun.
Let’s stop beating around the bush and jump right into it. We will not only show you adorable accessories which are super easy and eco-friendly, but we will also teach you how you can make them.
Bedazzle Your Ear
We had to put this on the very top. Earrings are the most used and loved accessories. When a human looks at another, they usually look from top to bottom. And ears seem to be pretty high up on our bodies. So adding a statement on there could be a good move.
So before I move on to show you what we have prepared for you, let me ask you what style of earrings you usually like to sport? Even though what we are about to show you may not be to your taste, please hear us out. Because once you learn how to make earrings at home, you can create your own, however, you want it.
Don't Mist the Cloud Earring
Clouds are one of the top-tier visuals that everyone of all ages adores. They are always there, sometimes unnoticed, but when noticed, one of the prettiest sights you see.
Just like the clouds above the sky, that doesn't overpower the beauty of the sky but rather complements it. Cloud earings are the same. Basic yet you keep reaching for it. Its off-white shade is so versatile, you can pair it with any outfit or for any occasion. They are perfect to dress up or dress down any look.

The adorable earrings will compliment all outfits without overshadowing any of your outfits. They do not have a distinctive element or visual, but something about it makes us keep reaching for it.
In case you haven't had cloud earrings, you hadn’t had the foggiest idea what you mist. Let us now learn how to make them.
Things you need to make cloud for earrings:
- White roved wool
- Felting Needles
- Needle pad (thick foam or needle felt pad)
It’s quite easy to needle-felt cloud earrings. All you have to do is roll some white wool in your palm and needle the wool while you slowly turn it. If you’re new to needle felting then you could join the free easiest way to learn needle felting.
The best tip for needle felting is to add wool slowly, you can always add wool but never remove it. And please be safe as you’re dealing with sharp objects. Keep doing that until you have 3-4 cm cute clouds.
It doesn’t have to be perfect or the same, clouds come in all shapes and sizes. This is the perfect time to embrace their uniqueness.
Attach it on earring
The best thing about using felt is that they are very easy to sew and pierce. To pierce the top of the cloud, use one end of the tiny ring. For your ease, you can use pliers to bend the tiny ring. If piercing the ring gets difficult then you can add the tiniest loop with white thread and needle.
Attach the ring to the hook and there you have the cute handmade earrings.
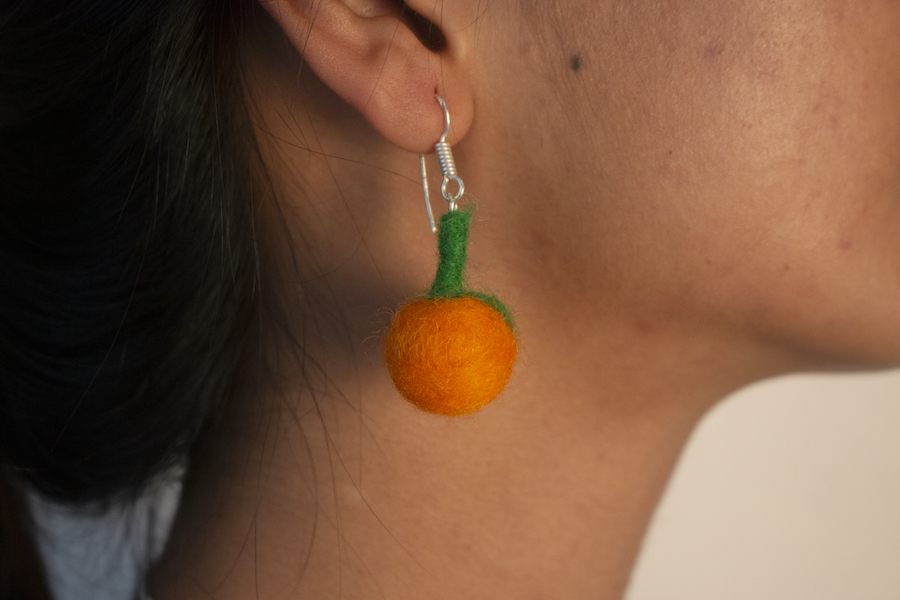
Squeeze the Punch with Orange Earrings
You might be thinking, how about if I don’t want a basic earring. I know, not all of us are fans of the basics. Some of us want a bit of zest, a bit of glitz, and something more than just cloud. There’s nothing wrong with the basic earring designs, we love an accessory that keeps your eyes peeled.
Now, the possibilities are endless. You can make what your heart desires. But as a demonstration, we decided on oranges. Orange earrings have the perfect amount of pop of color but are equally easy to make. Perfect for beginners.
They are amazing for kids. Not only do kids love earrings and it’s really cute, maybe now you can encourage them to have more oranges. Vitamin C is very vital for our body and metabolism.
Now, let’s get started on making these tiny cute orange earrings.
Things you need to make oranges earrings:
- Orange and green wool roving
- Felting needles
- Needling Pad or Thick Foam
Take a tiny bit of orange wool and roll it in your palm. Then keep needling until you get a firm smooth 1cm ball. For small business owners who are looking to open a business, you can buy 1cm felt balls wholesale with free shipping.
Now to the orange ball, add leaves and stems. For stems, you can roll the green wool in thin strands and needles until it’s firm and stands up. Add the tiny ring to the end of the stem. This is why you should make sure your stem is firm, or else your earring won’t last long.
Repeat the same process of popcorn earrings for the installation and here you have it.
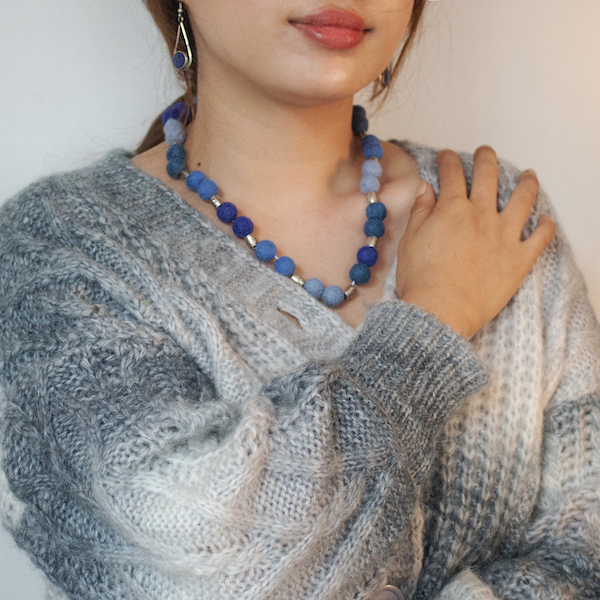
Love A Great Blue Felt Bead Necklace
Necklaces are great to decorate your neck. Here’s a really pretty way to add elegance to your neck. This kind of necklace looks adorable especially when you’re wearing a low neck and it enhances your decolletage.
It’s really easy to make them, all you need to do is choose the colors and quantity you want. If you want to, you can add designs to your felted balls or use a different assortment of colors for the aesthetic you want and make personalized necklaces.
We are showcasing the colors that bring out the elegance in any girl. The ribbon for you to tie around your neck makes it completely customizable. Whether you have your hair tied up or down, it still will look great.
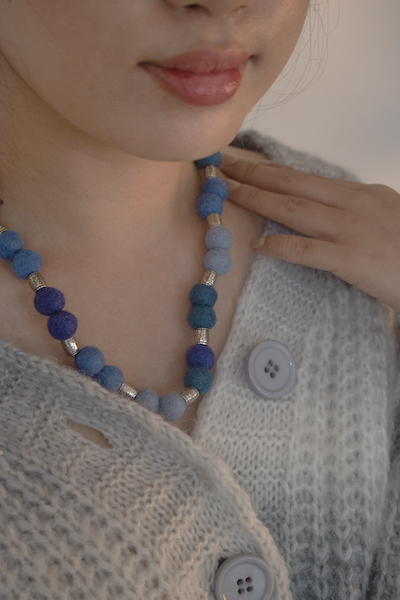
We also added some beads with felt balls to make it a bit more dazzling, it’s optional. All of the materials are reasonable and take you less than 10 minutes to make. Hang the necklace on the place where it perfectly enhances your neck.
Things you need for Felt Bead Necklace
- Felt Balls
- Nylon thread (stronger than cotton)
- Beads (optional)
- Needles
- Hoops
Take your felt balls and beads. Plan out how you want them to be placed. After deciding, grab your handy needle and thread, start sewing the felt balls. Make sure you make a knot at the end and at the beginning to lock in place.
Add a tiny loop at the end of the necklace to tie it. In case you want to add more elegance, add ribbons for a more delicate touch.
You could use metal chains if ribbons aren’t your thing. However, these metals can sometimes turn into rusty ugly colors due to wear and tear and exposure to heat and moisture. Some people are even allergic to metals and can have allergic reactions.
A really easy hack to make sure your chain doesn’t oxidize is to coat them with clear nail polishes. The clear nail polish will help to create a barrier that protects your chain from external factors. It can help with skin irritation but if you are allergic to metal chains then, we don’t suggest using them. Trust me, not going to be worth it.
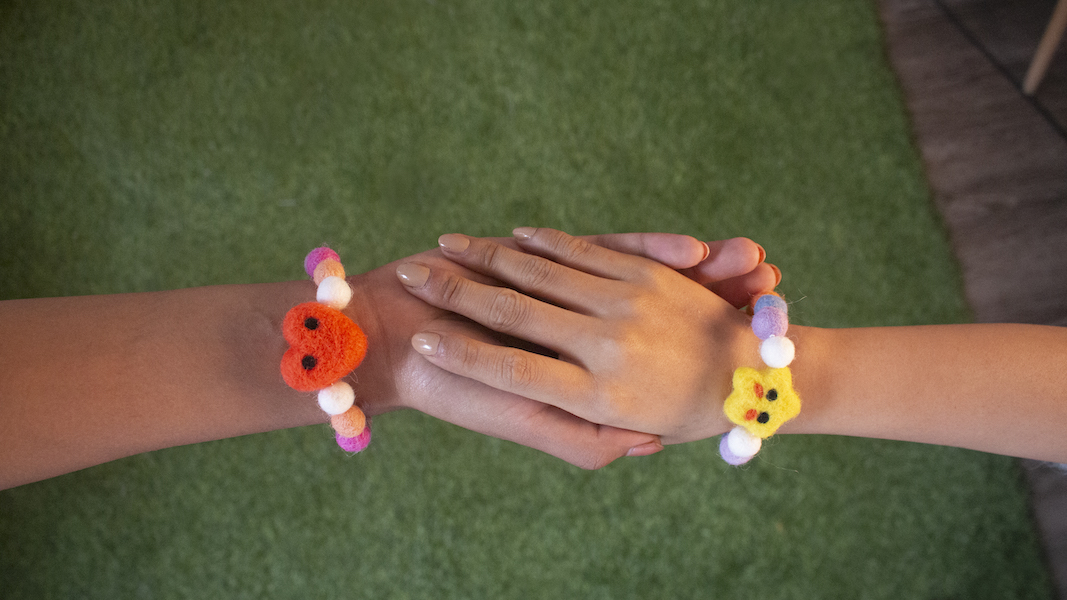
You're A Lovely Star Bracelets
Bracelets are adorable. A lot of 90s trends had made a huge comeback this year. Chunky, colorful, and funky bands are such a hit. You can see many celebrities wearing these funky bracelets in their music videos which also contributes to the craze.
Bracelets are easier to make rather than necklaces. A Felt bracelet can add fun elements to your overall vibe. And for our lovely parents out there, these are such a great gift to your kids and if you choose it, would be a fun bonding moment.
Things you’ll need for fun bracelets
- Wool for creating balls and other shapes (you can buy readymade felt balls and adorable craft supplies)
- Thread and needs
- Ribbons (optional)
We have these stunning and cute stars and hearts for the center of your bracelet. You could easily make them, following our needling tutorial. These tutorials are thorough; we promise you can create your craft supplies by the end of the tutorial.
We also have a series specially dedicated for beginners to teach how you can create your product and ways to add more oomph to them and finally how you can use them in your daily life.
At the end of the bracelet, you can use the thread to tie. The thread won’t even be noticeable or use the ribbons if you wish to. Again, you have the option of using your regular metal bracelet clasp.
So here you have the adorable bracelet idea that you can pair with a fluffy sweater and jeans.
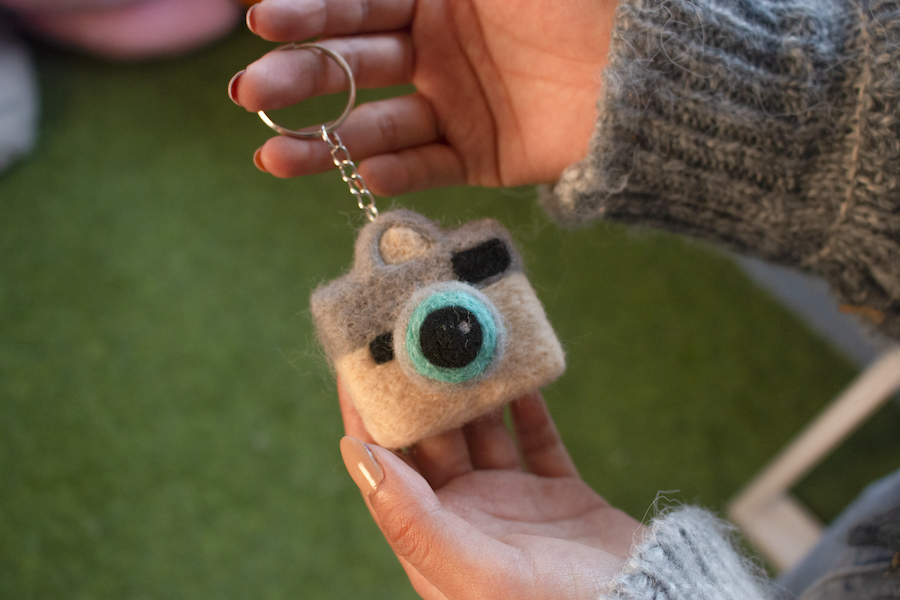
Capture Your Memories Keyrings
We cannot stress enough how handy keyrings are. It’s a necessity at this point. Fluffy, soft, and eco-friendly keyrings don’t sound too bad right? They are also one of the greatest ideas for starters of small businesses.
Not only are they super easy to make and source, but they also have a great demand in the market globally. The keyrings are great back-to-school products where you can not only show off how adorable your felt keyring is; also show off how talented and crafty you are.
You can head off here where we teach you how to make felt keyrings from scratch.
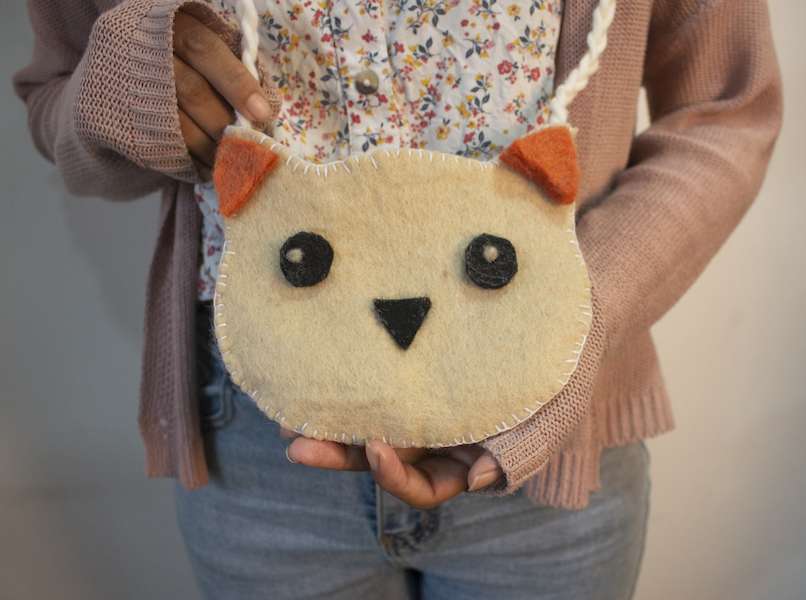
Cat-astic Felted Bags
We have saved the best for the last. Let’s end it with a style. This is not just typical crafting accessories, when we meant making a bag, we meant business. But don’t worry, it’s easy and fun.
You don’t find adorable bags made out of your favorite characters in the market. Imagine surprising your child with their favorite character bag, they would carry it with them everywhere. Or you could surprise yourself, I mean, both adults and children can rock these wool felt bags.
The best part? It only costs you a few pennies, not only is it cheap but you can design it however you want. And for people who aren’t best with needles, trust me it’s super easy. You could of course use hot glue, but that won’t be sturdy and you want it to be functional besides looking adorable.
Things you need to make this Cat-astic Bag
- Felt Sheet (colors of your choice)
- Glue
- Wool, Needle, and Thread
- Scissors
- Patterns
Start with planning what you want to make and sketch it. You can even google the outline of the design you want and print it. Then cut the pattern and use it as a guide.
Begin by cutting your shapes starting with the overall base and details such as eyes and noses. Don’t forget to cut two pieces of the base. Then start stitching the two base shapes together leaving the top.
The video shows how easily you can sew. I'm not good with sewing and it was my first time, yet I got the hang of it pretty easily. When you reach the top, repeat the same stitching technique, but stitch the edges individually and not together.
For the tiny details, we glued them as it’s easier. You can sew them if you want, just make sure it’s the same color as the felt sheet. Now finally comes the bag’s strap. You could braid the wool together and attach it to the bag.
There you have the five easy felt accessories that you can create your own. We have focused on making DIY accessories primarily using felt because not only is it ecological and biodegradable, but also hypoallergenic, antimicrobial, and reasonable.
Can we make eco-friendly a trend? Can we normalize using sustainable materials in all industries possible? So let’s hop on the bandwagon and support sustainable accessories.
If you have made any of the above-felt crafts then please share with us. We are active on all social media and would love to see your beautiful creations.
Categories
Other Posts
- Sustainable Felt Crafts: Eco-Friendly DIY Projects You Can Make at Home
- Fun Felt Crafts for Kids: Easy Summer DIY Projects to Keep Them Busy
- Easy DIY Felt Flower Crafts for Spring Home Decor: Beginner-Friendly Ideas
- St. Patrick’s Day Crafts for Kids (No Sewing Required)
- Start the Year Right: How Wholesale Felt Can Help Your Business Achieve Sustainability Goals in 2026